构建&部署
前言
由于是展示项目,所以打包后可能较大,如果项目中没有用到的插件,可以删除对应的文件或者路由,不引用即可,没有引用就不会打包。
构建
项目开发完成之后,执行以下命令进行构建
bash
npm run build如果区分环境,请执行以下命令:
bash
npm run build:对应的环境分析构建文件体积 如果你的构建文件很大,可以通过项目内置 rollup-plugin-analyzer 插件进行代码体积分析,从而优化你的代码。
执行 npm run build 自动会生成分析图文件 build-report.htmlTIP
左上角可以切换 显示 gzip 或者 brotli 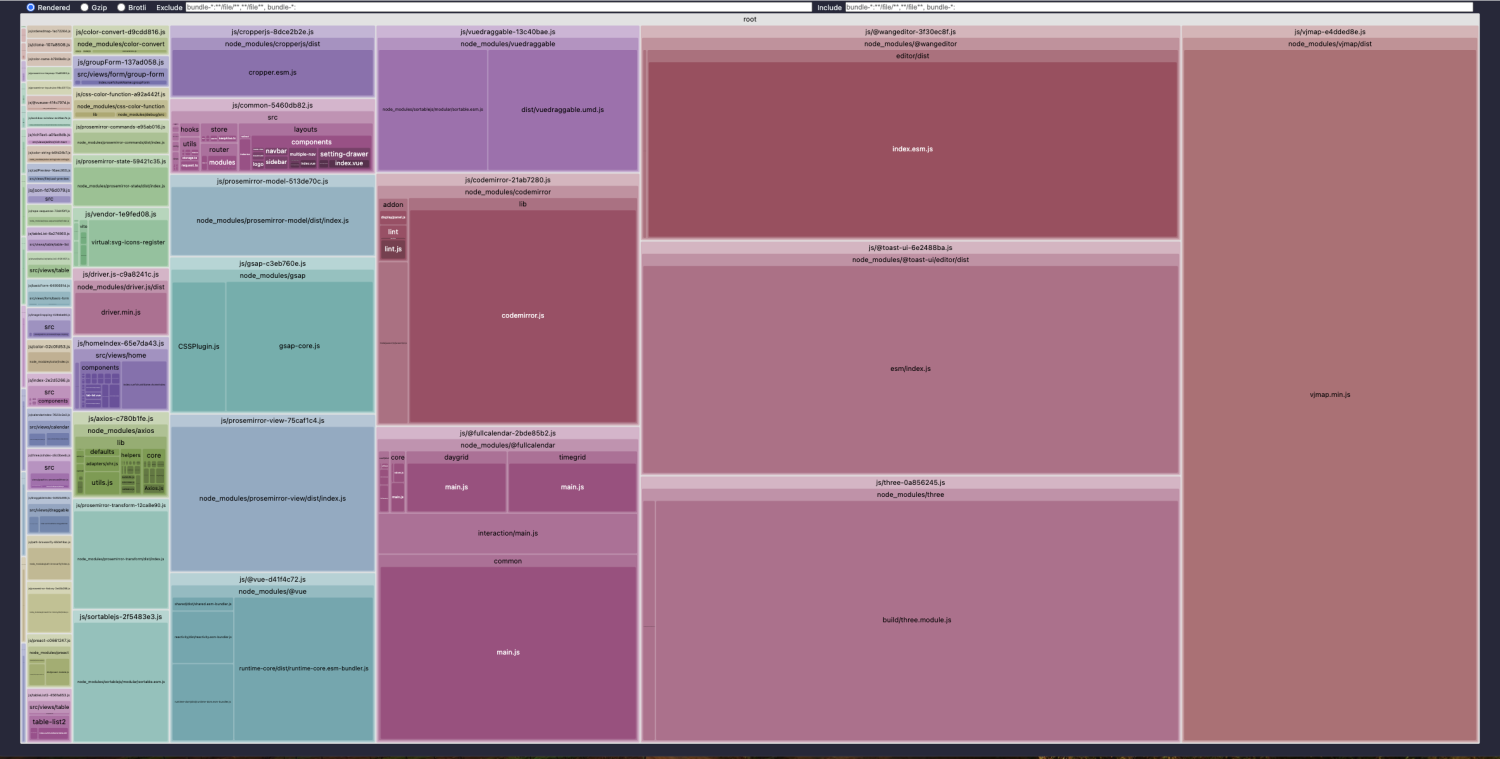
压缩
模板代码已通过 vite-plugin-compression 开启gzip压缩,如果需要改动,请在 vite.config.ts 修改以下配置。
pluginCompression({
  verbose: true,
  disable: false,
  // filter:()=>{}, // 那些资源不压缩
  threshold: 1024 * 500, // 体积大于 threshold 才会被压缩,单位 b
  deleteOriginFile: false, // 压缩后是否删除源文件
  algorithm: 'gzip', // 压缩算法,可选 [ 'gzip' , 'brotliCompress' ,'deflate' , 'deflateRaw']
  ext: '.gz', // 生成的压缩包后缀
})
TIP
开启 gzip,并配合 nginx 的 gzip_static 功能可以大大加快页面访问速度,如果改配置不生效,请自行探索nginx配置。
部署
发布
简单的部署只需要将最终生成的静态文件,dist 文件夹的静态文件发布到你的 cdn 或者静态服务器即可,需要注意的是其中的 index.html 通常会是你后台服务的入口页面,在确定了 js 和 css 的静态之后可能需要改变页面的引入路径。
例如上传到 nginx /srv/www/project/index.html
bash
# nginx配置
location / {
  # 不缓存html,防止程序更新后缓存继续生效
  if ($request_filename ~* .*\.(?:htm|html)$) {
    add_header Cache-Control "private, no-store, no-cache, must-revalidate, proxy-revalidate";
    access_log on;
  }
  # 这里是vue打包文件dist内的文件的存放路径
  root   /srv/www/project/;
  index  index.html index.htm;
}
前端路由与服务端的结合
项目前端路由使用的是 vue-router,所以你可以选择两种方式:history 和 hash。
- hash 默认会在 url 后面拼接
# - history 则不会,不过 history
需要服务器配合可在src/router/index.ts内进行 mode 修改
bash
import { createRouter, createWebHashHistory, createWebHistory } from 'vue-router';

createRouter({
  history: createWebHashHistory(),
  // or
  history: createWebHistory(),
});
history 路由模式下服务端配置
开启 history 模式需要服务器配置,更多的服务器配置详情可以看 history-mode。
这里以 nginx 配置为例
部署到根目录
- 配置项目根目录路径,需要更改
build/config.ts文件中的 vite_project_root
...

// 项目根目录
export const vite_project_root = '/'

...- nginx 配置
bash
server {
  listen 80;
  location / {
    # 用于配合 History 使用
    try_files $uri $uri/ /index.html;
  }
}
部署到非根目录
- 需要配置子目录路径,需要更改
build/config.ts文件中的 vite_project_root
...

// 项目根目录
export const vite_project_root = '/sub'

...- nginx配置
bash
server {
  listen       80;
  server_name  localhost;
  location /sub/ {
    # 这里是vue打包文件dist内的文件的存放路径
    alias   /srv/www/project/;
    index index.html index.htm;
    try_files $uri $uri/ /sub/index.html;
  }
}
使用 nginx 处理跨域
使用 nginx 处理项目部署后的跨域问题
在env文件中配置前端项目接口地址
在 nginx 配置请求转发到后台
bash
server {
  listen       8080;
  server_name  localhost;
  # 接口代理,用于解决跨域问题
  location /api {
    proxy_set_header Host $host;
    proxy_set_header X-Real-IP $remote_addr;
    proxy_set_header X-Forwarded-For $proxy_add_x_forwarded_for;
    # 后台接口地址
    proxy_pass http://110.110.1.1:8080/api;
    proxy_redirect default;
    add_header Access-Control-Allow-Origin *;
    add_header Access-Control-Allow-Headers X-Requested-With;
    add_header Access-Control-Allow-Methods GET,POST,OPTIONS;
  }
}